
Details to Add To Your Wix Website So It Stands Out
- Border7 Studios

- Apr 27, 2021
- 3 min read
Updated: Jul 7, 2021
"The devil is in the details."
...and when it comes to design, details matter. They are what make a website stand out with a memorable personality, or a site that looks like it's a template filled in with content.
As we've talked about before, we believe it's more important to get SOMETHING up than to never launch your Wix website at all while you chase perfection.
So, if picking a template and filling it in with content is what will get you online faster, that's cool, we are not hating!

We do, however, want to share some fun design/feature tips you can do with Wix to make your website stand out.
What makes a website's design especially strong is consistency.
Once you've established the design for your brand (color scheme, theme, style, fonts, etc.) stick to it! By following your brand style guide, you'll be showing your audience that you're professional and consistent, which helps to build trust.
For more info & tips on how to use stylescape to establish your design, click here.
Back to Top
This is a fun feature you can add to your Wix website that when clicked will scroll a user back to the top of your website.
Why We Like It: The back to top detail is a great addition to any website (especially if you can use your logo, or a design that coordinates with your theme). It provides another opportunity for you to express your brand's personality, and is a great user experience addition, as it saves someone time from having to scroll back up themselves.

How To Add It to Your Site:
Add the image or a vector file that you'd like to use as your back to top button (get creative, we've used fishhooks for fishing sites, a wrench for a handyman, and a Christmas tree for a tree farm - you get the idea!)
Right click the image and click Pin to Screen. It's usually expected for this element to be on the right bottom area of the screen, so to avoid surprises with usability, we recommend pinning it there. Make sure you click the orange toggle button that says "show on all pages."
Finally, right click the element again and then click "link." You will then see the option of Top/Bottom of Page. Click Top and then done.
Background Elements
This is where you can really make your theme shine through. When adding a strip to the footer or a section of your website, add a graphic as the background image. You can still have a color background.
Why We Like It: A website can start to look bland if it solely relies on color for its backgrounds. Images and pattern backgrounds are a great way to help spice up a site while still featuring your brand's theme.

How to Add It to Your Site:
Create the element you'd like to use. If you don't have PhotoShop, Canva is a fantastic tool we recommend to clients, so they can create their own graphics. Be sure to use the "transparent background" option, so you can play around with the color background, or overlay strips within the Wix Editor.
Add the element to a strip within the Wix Editor to verify that you got the sizing & placement right. You might have to resize the element in PhotoShop or Canva to make sure it is displayed properly.
After adding the element, click settings, and make sure you select either "scale to fill" or "original size." Otherwise your background will be set to tile, and will be repeated, which might not be the look you're going for. Adding your background to a strip is the best way to ensure it will size up/down to fit various screen sizes, but you'll still want to make sure you check on the mobile editor to do some tweaking, if needed.
Custom My Account Icon
You might have noticed that the my account bar that automatically comes with members & ecommerce sites is limited with how much you can customize it.
So, what we like to do is find an icon that fits with the brand (you can also use a person icon to keep it simple), and then link that element to the my account area.
This way, you can customize it to your liking and keep your design as clean as possible (there are sometimes placement issues with the my account bar, so we like that this detail gives us some more control).
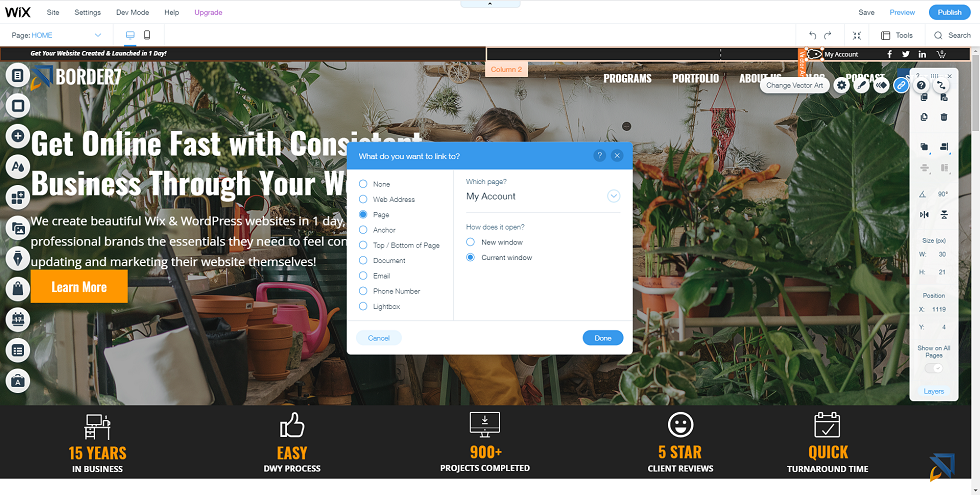
How to Add It to Your Site:
Add the element you'd like to use as the icon by clicking the plus sign and add image or vector file. Place it in the header or footer (or wherever you'd like to link to my account), right click the element, click Page and then choose "My Account."
Check it on mobile to make sure it is displayed to your liking
Publish your changes!
These are just a few little design details you can add to your Wix Website, but are a nice touch to have.
If you have any questions or get stuck, email us at hello@border7.com!


