Code HTML in Half the Time: Meet Emmet
- Border7 Studios

- Oct 14, 2015
- 3 min read
Updated: May 11, 2022
Emmet is just the best productivity plugin! It allows you to write code snippets that with the press of a button instantly form into beautify formatted HTML. You’ll no longer be typing tag after tag, or copy and pasting every few minutes.
After learning a few basic things about how Emmet’s syntax works, you can easily begin coding in a much more productive way. But don’t fret, learning the Emmet abbreviations isn’t hard. Its syntax is inspired by CSS’s selectors. You’ll be able to code complex HTML formatting in far fewer key strokes than if you typed it all out by hand.
So how do you get Emmet you’re wondering? On the Emmet download page select your preferred editor. Emmet is offered on many popular editors, so you shouldn’t have any trouble getting it. In this we’ll use Sublime Text 2 to demonstrate its features.
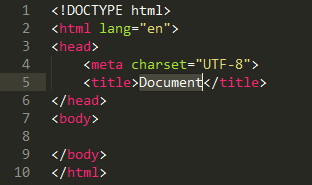
Here’s an example, you need to create an HTML document to test something out quickly. Just type ! in your new document, press tab and voilà!

You instantly have a template for an HTML document. Here’s another example of code.

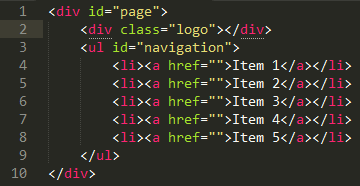
Let’s break this up to see exactly how it’s working:
#page will create a div with an id “page”.
The > is the child operator, which will next the next element.
div.logo creates a div with the class “logo”.
ul#navigation will create a ul element with an id “navigation”
Then there’s another >, which will nest our next element, an li tag.
The li element has a *5 next to it. This is going to create the element 5 times.
There’s another > and finally we have a{Item $} as our last command. This is going to create an a tag with “Item” in the text. The $ is the incremental operator which will put the text “1” the first time, “2” the second time, etc.
So our final output is:

Emmet also works well with Bootstrap. Here’s an example using Emmet to render Bootstrap code in creating a quick structure for a website.

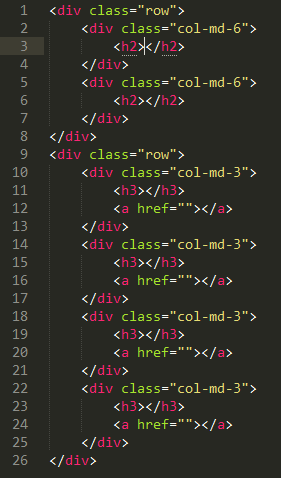
Which upon pressing tab renders:

The explanation of this code is:
The first div.row code will create a div with the class row.
The > following that will nest the div.col-md-6*2, which will in turn create a div with the class col-md-6 twice because of the *2.
The > will nest the next h2 tag.
The ^^ code will climb up two nesting levels, putting us back at the no indentation (the first) level.
Following that is div.row which will create a div with the class row.
After another nesting operator, and then div.col-md-3*4 which creates a div with the class “col-md-3” four times. A final indention > puts an h3 tag in each of the four divs we created above.
Other Cool Things With Emmet:
Lorem Ipsum Generator: “Lorem ipsum” is frequently used as placeholder text to test and see how the site will look when actual text is placed in. You can have Emmet generate “Lorem ipsum” text by typing lorem or ipsum. You can generate a certain number of words of Lorem Ipsum by typing lorem followed by the number of words you want to generate. For example, lorem100 will generate 100 words.

Emmet Works with CSS: Want to take advantage of Emmet for CSS? Well you can, and it works quite well. Typing m10 converts into “margin: 10px;”. m10-10-15 into “margin: 10px 10px 15px;”
The Emmet Cheat Sheet: Take advantage of this tool which will help you learn even faster.


